Go back to Moab Area page.
The Flawed Plan
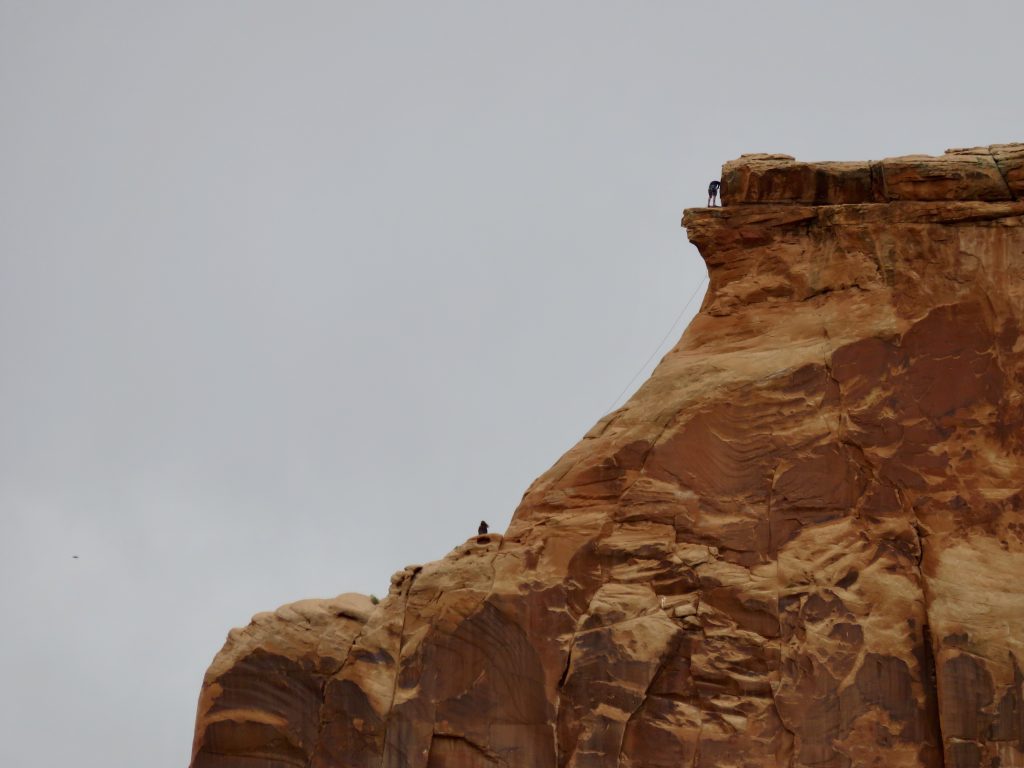
The Priest (ctr. of photo).
Shirley in the Rectory-Castleton saddle.
“Shit!” I exclaim mostly to myself. “I’m sorry baby, I don’t think we can make it”. The milky fluid outside the car window has been steadily turning brighter. We should’ve been 200 miles further south by now. I pull off interstate 15 into a rest area some 30 miles north of Salt Lake City. Shirley stirs briefly but then goes back to sleep. Tired but mostly pissed off at myself and our bad luck I fade to sleep in the front seat of our truck.
The plan was simple – if a bit ambitious. We’d leave Friday after work, push it through the night and 14 hours later find ourselves in Moab, UT. Bag a tower (ideally two) and be back home in Portland, Oregon late Sunday night (in time for work on Monday). The plan was born a few days earlier as I was climbing the walls in my cubicle looking for a reason to keep going to work till the end of the week. As always, Shirley did not require much convincing: “Sounds demented.” Was her initial response. But it was quickly followed by “… and we could bag Owl Rock on Sunday morning before driving back”.
The plan was flawed. It did not take into account the nasty weather we’d encounter en route. Left work Friday at 4 pm, picked up Shirley from her job and were eastbound on I84 by 5pm. Things were going great – speed limit + 12 mph. Then we hit the fog. Mile long patches at first did not slow us down much. We hit the Idaho border roughly on schedule. The fog patches then got denser and longer – in fact we were driving through constant fog. What should’ve been a 90 mile per hour speeding extravaganza through Idaho turned into a 60 mph slog. We were falling behind schedule.
I woke up two hours later at the rest area feeling angry and guilty at having wasted one day of our precious weekend. We made a u-turn and headed back to Smith Rock in Oregon in defeat.
A Better Way

Shirley on approach to The Priest.
The Priest from the summit of The Rectory.
We woke up before dawn a week later in Moab under clear, chilly skies. This time we flew to Salt Lake the night before (taking advantage of Delta’s price slashing) and arrived in Moab at the leisurely hour of midnight the evening before. We were headed for The Priest. The goal was to climb this magnificent-looking tower via its easiest route: Honeymoon Chimney rated at III 5.9 A0. I got the inspiration to climb this route while surfing piquaclimber.com. Brad and co. had written up an enticing TR from their climb of this route.
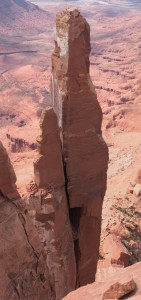
Honeymoon Chimney (The Priest)
Honeymoon Chimney.
The morning approach hike was nothing short of spectacular. We followed the climbers’ trail to the base of the 2nd cliff band beneath Castleton Tower taking in the views of the first rays of sunshine illuminating the lone tower. Beneath the upper cliff band, we cut left toward the Castleton-Rectory saddle. As we turned the corner, the world opened up in front of us: we were in one of the most amazing of settings! To the south was the sleek shape of Castleton; to the north was The Rectory – an elongated, narrow mesa. The Priest was peeping in from behind it. We were on the crest of a sharp ridge with views of eastern Utah desert and the La Sal Mountains on the horizon. The skies were clear and the temperature was almost pleasant. Finding the start of Honeymoon Chimney is trivial – the obvious dihedral with a harder-than-it-looks OW crack on the southwest face of the tower.
.
Pitch 1.
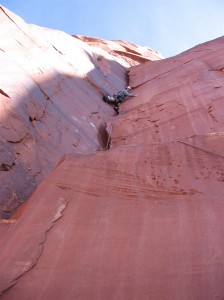
Looking up pitch 1, I realize that I will not be needing my #5 Camalot (yes – the TR’s and message board exchanges on the web were right). I pull onto the flat-topped boulder at the base of the dihedral and begin looking up at the start of the OW. There’s a bolt about 15 feet above. I consider my options. I try stemming the dihedral. Approach works for a couple of feet and then the nubbins run out. I back off. Time for plan B: how bad could liebacking be? Make my way up so that my eyes are level with the bolt and then my arms (surprise!!) pump out. I’m forced into a quick jump/fall back onto the boulder. Off-widthing is not a skill I have practiced much – come to think of it, I don’t think I’ve ever done any true off-width jamming? On our climb of Kor-Ingalls on Castleton Tower over Christmas I was essentially able to either stem or lieback my way through most of the 5.9 OW crux. Desperate, I jam my right foot into the crack spanning it with my size 15 foot. My right arm is deep in the OW while my left arm and leg are desperately smearing and pushing off of anything they can find on the wall in front of me. The going is very strenuous but I’m finally making upward progress! I clip the bolt, move two feet higher getting myself wedged partially into the OW and grab for a hold with my left hand. I can’t get my body out of this contorted position and end up falling as my hand pumps out. Time for “take 2”. I repeat my desperate sequence of moves and this time try to move quicker: I grab for the same (now very well chalked-up) hold with my left hand and throw my right hand for the top of a bulge. It finds a decent hold and I pull myself over the bulge. There a second fixed piece (piton) awaits. I clip and hang shaking out my arms and huffing profusely! The going is not quite as desperate on the next 20 feet. I quickly use up my two #4 Big Bros.
.
More pitch 1.
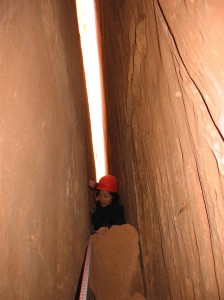
Above, there are several chockstones wedged in the off-width – these either suck up small cams/nuts or have slings on them. Finally, I arrive at a point where I can look inside the widening OW and see the huge belay chockstone about 50 feet into the opening. I try to squeeze myself into the slot but I can’t seem to get in. I try a few more times and then decide to jettison the remainder of my rack – leave it hanging on the last piece hoping that Shirley (with her petite figure) will have an easier time getting it through the squeeze. Still “no go”. I move 5 feet higher and am finally able to move inside. Now the real fun begins. Suck in chest and stomach (try to suck in the ass as well) and move two inches. Exhale. Rest. Repeat. A short 45 minutes later I arrive at the belay, puke out breakfast and belay Shirley up. Though not too thrilled to find the complete rack at the entrance to the squeeze chimney, she has little problem getting the junk through. The remainder of the route is just pure fun.
.
Pitch 2.
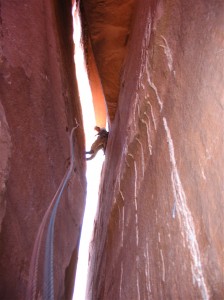
Pitch 2 is a bit run-out but offers very secure 5.6 chimney climbing (2 bolts protect about 60-70 feet of chimneying). It puts us on a very comfy ledge and – finally – in the sun! Small prop plane circles around us a couple of times and then files through the opening between Rectory and Castleton. We dispatch pitch 3 in A0 style (goes free at 5.11-) via the bolt ladder (mostly good-looking pitons). Shirley back-cleans the bolt ladder and exits onto the narrow, balancy ledge above smoothly despite some reach difference issues. The belay for this pitch is the most uncomfortable one on the route: an exposed, sloping ledge with some manky fixed gear supplemented with cams. Fourth and final pitch presents the most fun climbing on the route: a fingers to thin hands crack in a beautifully exposed dihedral (~5.8). Soon we are on the summit looking for a place to put down our names in the very “busy” summit register. Three double rope raps put us at the base of the tower on the opposite side. The hike around the northern side of the tower reveals some amazing views – The Priest resembles a seahorse from this vantage point. Very satisfied, we hike down getting below the lower cliff band just as the sun sets. Enjoy the victory pizza and beers in Moab (stay away from the Chinese place in town – on the main drag – my Mandarin is rusty, but I do believe that the original name contains the phrase “will take the a.. out of you”). The weatherman is predicting a snow/rain storm for Sunday. With little hope for climbing the next day, we go to sleep (exhausted!) without bothering to pack or even to set the alarm.
Ottos Route (Independence Monument)

Otto’s Route.
As I wake up – probably more sore than I’ve ever been before – at 7, I see blue, clear skies overhead. We begin packing frantically. What do we go for? We’d love to nail another tower – but which one? We decide to check out the Independence Monument in Colorado (~2 hours driving time to the east). Get to the trailhead at about 10 am and start hiking. The hike is downright ugly to start with (following a barbed wire fence protecting the sprawling suburbia of Fruita, CO) but improves 20 minutes in. The Monument comes into view about 45 minutes from trailhead. From this point of view (head-on) it looks awesome – sleek and imposing.
.

A close-up.
We climb Otto’s Route – a grade II – III 5.9. I find the crux kind of hard (though short, 15 feet?) – maybe it’s the fatigue and soreness from previous day’s climbing or maybe I just suck. Regardless, we top out and enjoy the sunny summit. We get back to the car early enough to drive into the heart of the Colorado National Monument and snap some photos of Independence tower from the rim road. More beers and food (nothing feels better after a climb IMHO) in Fruita and we’re back in Salt Lake before midnight. Fly back to Portland early next morning. I drop Shirley off straight at work while I – lucky enough to have 4 more vacation days than she – head home and sleep.
Good weekend.
The Photo Essay
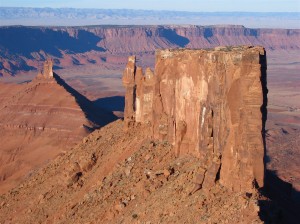
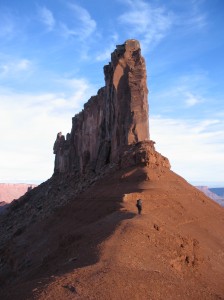
The Priest

Shirley starting the approach hike to The Priest. Castleton Tower is on the right; The Rectory is on the left (Feb. 2005).

The Priest (leftmost), The Rectory (the long mesa), and Castleton Tower as seen from the trailhead (Feb. 2005).

On approach to The Priest with the north face of Castleton Tower dominating the view (Feb. 2005).

Shirley in the Rectory-Castleton saddle during our approach hike to The Priest (barely visible as a separate tower at the far left side of The Rectory). The southern prow of The Rectory (with Fine Jade, III 5.11-) is in the foreground. A spectacular setting (Feb. 5, 2005).

Shirley on approach to the Priest with Castleton Tower in the background (Feb. 2005).

Southwest face of The Priest as seen on the approach. Honeymoon Chimney starts up the obvious dihedral.

Starting up the Honeymoon Chimney on The Priest (Feb. 2005).

Leading pitch 1 (Feb. 2005).

Leading pitch 1 of Honeymoon Chimney…the wideness continues (Feb. 2005).

The wrestling match that is pitch 1 (Feb. 2005).

Shirley beginning the horizontal chimney section of pitch 1 of Honeymoon Chimney (Feb. 2005).

Shirley almost at the end of the struggle (Feb. 2005).

Like fun (Feb. 2005).

Leading the easy chimney on pitch 2 of Honeymoon Chimney (Feb. 2005).

Shirley finally out of the chimneys (pitch 2) on the Honeymoon Chimney (Feb. 2005).

Looking towards Castleton Tower from pitch 2 belay on Honeymoon Chimney (Feb. 2005).

Shirley at the pitch 2 belay (Feb. 2005).

Leading the bolt ladder on pitch 3 of Honeymoon Chimney (Feb. 2005).

More of the ladder (Feb. 2005).

Looking back towards Shirley from the A0 section of pitch 3 (Feb. 2005).

Shirley at the base of the A0 bolt ladder on P3 of Honeymoon Chimney. The lower part of the pitch requires some easy stemming (Feb. 5, 2005)

Shirley nearing the top of the ladder (Feb. 2005).

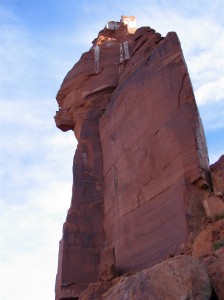
Shirley at the belay atop P3. Anchor consists of one shitty bolt, one mystery fixed piece (you mostly see slings coming out of the crack) and whatever marginal trad gear you can stick in (Feb. 5, 2005).

Shirley following the fourth and final pitch (5.8) of Honeymoon Chimney (5.9 C1) on The Priest (Feb. 2005).

The Rectory (left) and Castleton Tower as seen from the summit of The Priest (Feb. 2009).

Shirley on the summit of The Priest with the Castleton Tower in the background (Feb. 2005).

Sister Superior (foreground) and The Covenant mesa as seen from the summit of The Priest (Feb. 2005).

Daddy on the summit of The Priest with the Convent in the background (Feb. 2005).

Shirley rapping off the summit of The Priest (Feb. 2009).

Shirley on rappel number 2 (Feb. 5, 2005).

Shirley on the 3rd and final rappel (Feb. 5, 2005).

Northeast face of The Priest is in the shadow. Northwest face is in the light. Honeymoon Chimney is around the corner on the right (Feb. 2009).

The starting dihedral of the Honeymoon Chimney on the The Priest in the afternoon after our climb (Feb. 2005).

Shirley hiking around the base of The Priest. Castleton is in the background (Feb. 2005).
Independence Monument

Independence Monument – its north prow (& piece of east face) from the approach hike (Feb. 2005).

Starting up pitch 1 of Ottos Route on Independence Monument (Feb. 2005).

Shirley nearing the top of pitch 1 of Ottos Route (Feb. 2005).

Shirley atop pitch 1 of Ottos Route (Feb. 2005).

Shirley topping out on pitch 2 (Feb. 2005).

Silhouetted Shirley at the pitch 2 belay (Feb. 2005).

Shirley atop the huge ledge system and at the base of pitch 3 (Feb. 2005).

Leading pitch 3 (Feb. 2005).

Shirley nearing the top of pitch 3 of Ottos Route (Feb. 2009).

Shirley on the large ledge atop pitch 3 of Ottos Route on Independence Monument. Pipe Organ Spire is in the background (Feb. 2005).

Leading the crux 4th pitch of Ottos Route on Independence Monument (Feb. 2005).

The crux moves (Feb. 2005).
Unknown climbers on the last pitch of Otto’s Route on Independence Monument. Same situation as on our climb except this photo was taken in April of 2016. was taken in April of 2016.
A close-up of the same team nearing the summit (Apr. 2016).

OK, back to 2005. Shirley on pitch 4 (crux) of Ottos Route. Note Otto’s chiseled steps in the slab (Feb. 2005).

Shirley following pitch 4 of Ottos Route…note the chiseled steps on the slab below (Feb. 2005).

Crux moves from above (pitch 4; Feb. 2005).

Pipe Organ Spire (prominent spire just right of photo’s center) and Organ Pipe Spire to its immediate right as seen from the summit of Independence Monument. This is looking east from the summit. The Monument Visitors’ Center sits atop the canyon rim in left half of photo (Feb. 6, 2005).

Spacious summit of Independence Monument (Feb. 2005).

Shirley on the summit (Feb. 2005).

Yours truly on the summit of the Independence Monument (Feb. 2005).
Go back to Moab Area page.